How to Fit a Door Frame Yourself
There comes a time when you need to replace interior door frames in your home. Over time doors frames may need replacing, due to damage or just general wear and tear. Usually, when buying a new door, door frames will be sold separately and often as door frame kits that you have to assemble yourself.
The door frame is an extremely important structure as this will need to be a straight, solid base for your door to fit and work correctly. This is why the task of fitting a door frame needs to be done correctly and safely. This is not a DIY project you want to skip corners on.
If the thought of creating your own door frame is a daunting task, don’t worry. This how to guide will talk you through each step, from tools, right the way through to how to fit a door frame yourself.
Step 1
Your previous door frame should already be removed.
The first stage of fitting your door frame involves your door lining kit. You will need to assemble this to create the lining of the door.
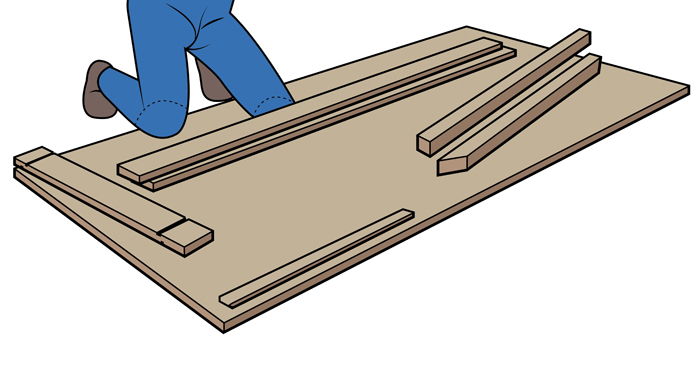
Place all the parts of your door lining kit in a large, open space. This will allow you to see all the parts needed, and help you stay organised. You will be spending a large part of this process on your knees, so it's essential that you wear knee pads to help take some pressure off your joints.
Step 2
You will need to locate your head section, you can identify this by the rebates on each side of the wood.
You will notice the rebates are different on both sides. On one side you will notice the rebates are spaced 762 mm apart, these are to suit wide doors. On the other, the rebates are spaced 686 mm wide.
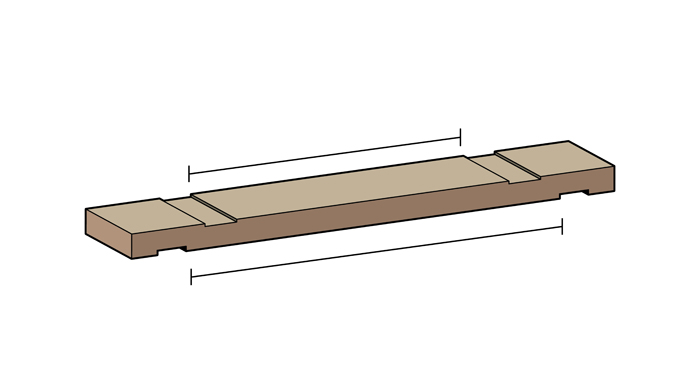
These rebates are spaced and measured like this to suit the two most common width doors. Check and match the correct width according to your size door.
Step 3
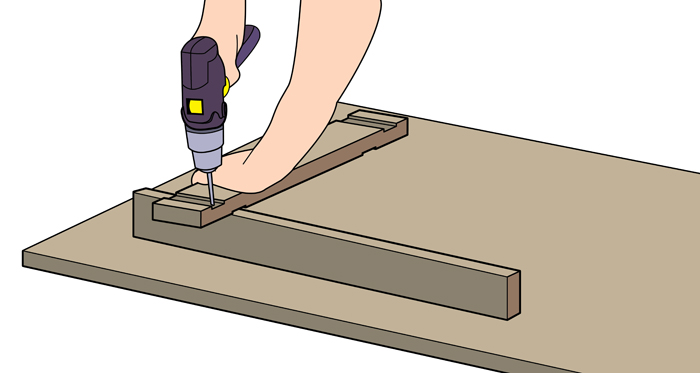
Once you have selected the correct rebate size for your door width you should then drill two clearance holes through each rebate. This will prepare the wood work so you are ready for the screws.
Step 4
Lay your head piece on the side, you should ensure that you are doing this on a flat surface. You should now insert both of the jambs into the correct position to the recesses in the head. Use a hammer and gently tap these firmly in place.

Using your clearance holes, secure the head and the jamb together with the 75 mm wood screws. Ensure that when you are carrying out this step that you keep the two pieces of wood flush with one another to allow the frame to be strong and sturdy.
Step 5
Now the frame is coming together. Place the existing frame onto a batten of wood (you may need someone to assist you with any heavy lifting). Using a saw, carefully remove the overhang edges of wood from the head piece.
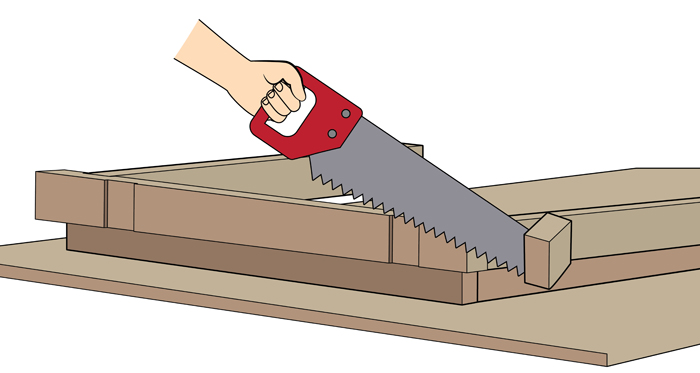
You want to ensure that the head piece is fitting snugly with the outside edge of each jamb.
Step 6
Your frame now needs bracing temporarily, this step ensures that the jambs are parallel and the head is square to the jambs. Creating this brace will create a straight and accurate frame when installing it.
To build your brace you should acquire some scrap timber, we recommend 50 mm by 50 mm timber.
Using this timber fit a brace on the door lining. Measure about 100mm up from the bottom of the door. Drill a nail on each side to secure it to the frame. We recommend using thin nails, as these will be easier to remove later.
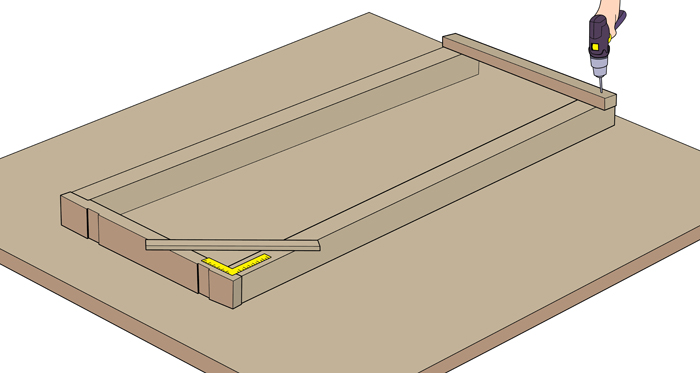
Make sure the measurement between the jambs is the same at the top and the bottom. Use a measuring tape to do this.
At the head of the door, using a utility square, place this on the top corner and create a brace. Using a piece of timber place this diagonally, and fix this into place using screws and a hammer.
This will keep the frame in place whilst the door lining is being fixed.
Step 7
The door lining is now ready to be fitted and placed in position in the door opening.
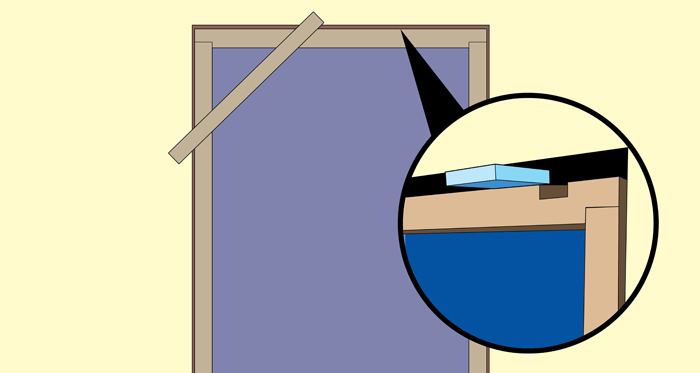
You will need some packing available, and we recommend purpose made plastic packers for this step. These are thin pieces of material which slot between the frame and the wall. Using these will allow you to compensate for any uneven areas of wall, and also allows you to align the frame correctly.
Place these packers roughly where the hinges will be placed. Use a hammer if you need to fix these deeper into the wall.
Step 8
The positioning of the fixings will depend on the type of wall you have, stud or brick.
Start by fixing the jamb that will be used for your door hinges. You will need to mark out your first fixing point from the bottom upwards.
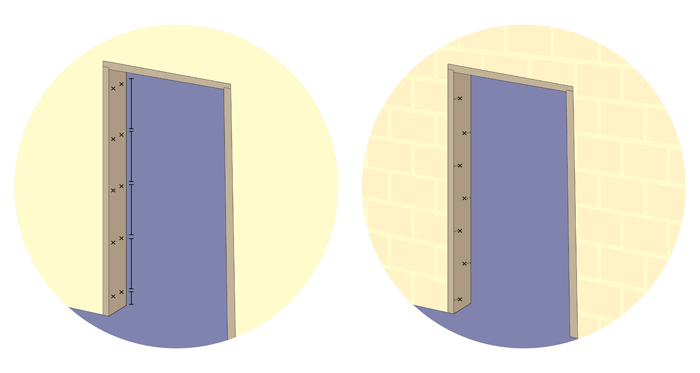
Measure 100mm from the floor, and mark out your first fixing point. From there measure 450mm intervals from there, and continue marking out your fixing point at each measurement.
- For stud walls
Each fixing will need to be 30-35mm from the edge of the jamb.
- For block or brick walls
Each fixing will need to be one third from the outside edge, and position each fixing in a staggered formation. It's important you use this method as this stops the bricks from splitting when you drill into them.
Once you have correctly marked out the fixing points, drill the screw holes at each clearance point. Please bear in mind that if you have a hardwood frame, you will need to countersink each hole to allow for the screw head.
Step 9
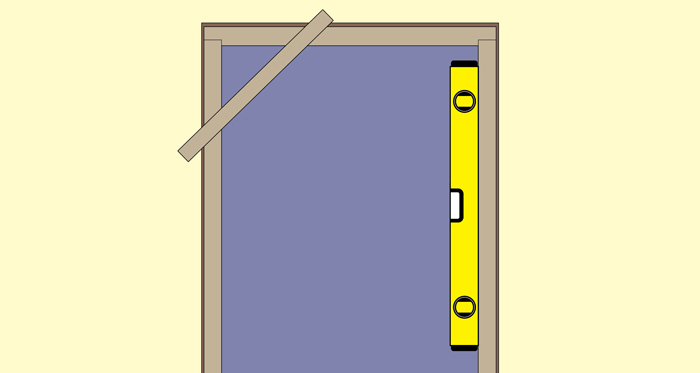
You will need to check your frame's position. Using a spirit level, line this up next to the jamb and check the frame is straight, level and plumb.
Step 10
If your wall is a stud wall, then you can fix straight into the timber. However if your wall is a masonry wall, you would need to mark up and create fixing holes using a special masonry drill bit, and then insert wall plugs.
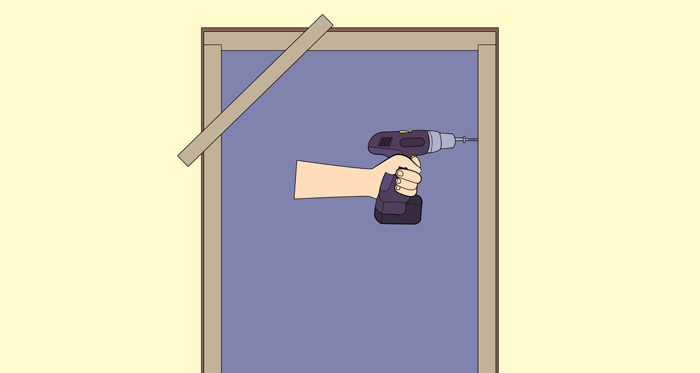
Usually 100mm fixing screws are used to fix the jambs. Use a drill to fix the screws into the jamb, ensuring it has been tightened and flushed with the face of the jamb.
Step 11
Using an 1800mm spirit level, place this on the face of the jamb to make sure it is level and there are no gaps present.
If there are gaps present, you can adjust the fixing screws and place packing as required until the frame is even and plumb.
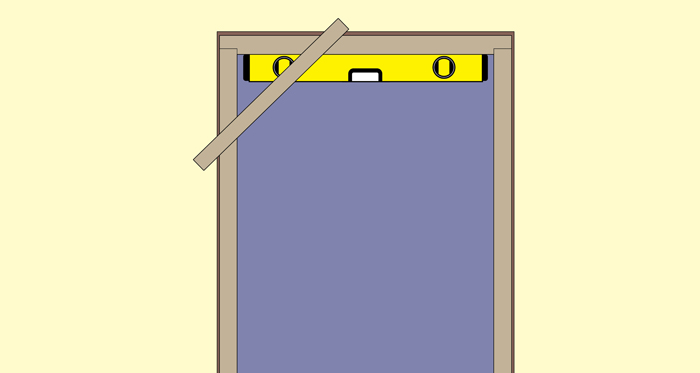
Take a shorter spirit level and check that the head of the frame is level.
Then, fix the other side of the jamb, using the same technique as the previous side. Once fixed, check the levels of the frame are straight.
Step 12
You can now remove the brace from the frame. Use a hammer and lightly tap the wooden battens away from the frame and remove the screws.
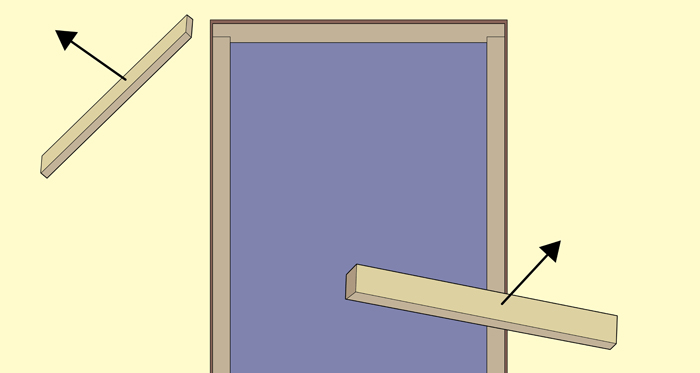
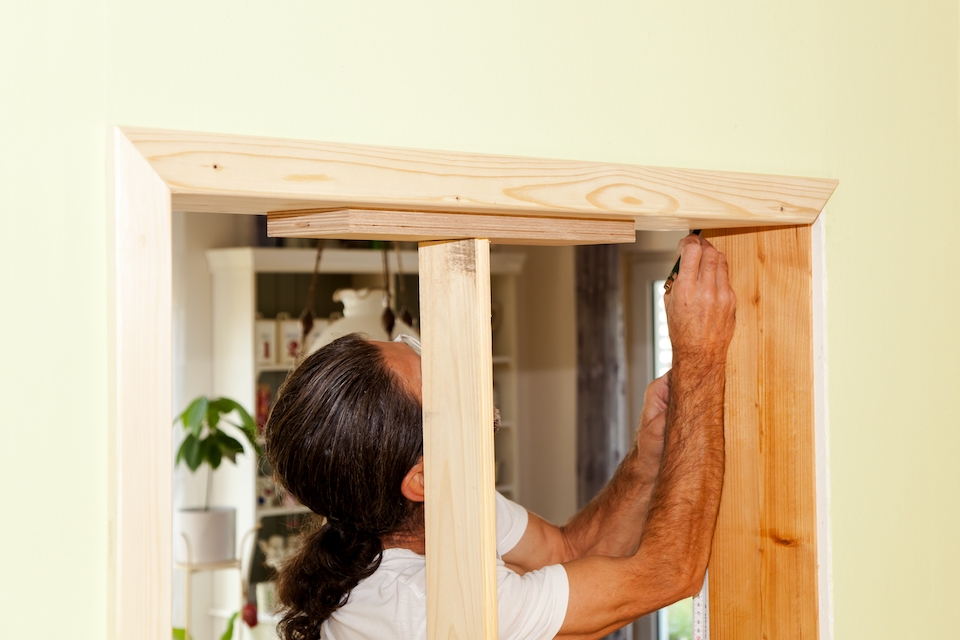
The frame is now fitted and the door can now be hung.
Tools to Fit a Door Frame
In order for you to correctly assemble your door frame together, you should get yourself fully equipped with the following tools:
- Utility knife
- Claw hammer
- Wood chisel (25mm or 37mm)
- Utility bar
- Tape measure
- General purpose saw panel
- Utility square
- Bolster
- Short spirit level (600mm)
- Long spirit level (1800mm)
- Power drill
- Wood bits
- Masonry drill bit
- Countersink bit
- Screwdriver
Safety Equipment to Fit a Door Frame
During this process you will be handling a variety of tools, including drills and handling timber. It is vital that you protect yourself and use caution, starting with the appropriate safety wear. Please ensure you wear the following before attempting to follow the steps.
- Protective gloves
- Safety goggles
- Knee pads
- Overalls to cover the skin
Please also keep in mind the following during this task to allow you to work as safely as possible:
- Keep the work area tidy whilst you work, this will not only keep you on track and organised, but also stop any trip hazards.
- Check that tools are in good condition before using them.
- Ensure you read the manufacturer's safety instructions.
- You will need to wear eye protection whilst drilling, sawing or using a hammer.
- When handling timber, always wear lightweight gloves to reduce the risk of splinters.
- During this process, ensure anyone in the house is aware you are working, and keep children out of the way.
Materials to Fit a Door Frame
You will need the following materials to allow you to create a strong and plush door frame.
- Door lining kit
- Off cut of plywood or timber
- Plastic packers
- 75mm and 100mm wood screws
- 50mm nails
- 50mm x 50mm planed timber
- Wall plugs
- Wood batten
It is important to note that not all doors are the same, door frame sizes will vary, and so will the material. Make sure you choose the appropriate door frame to suit and fit your door.
How to Prepare to Fit a Door Frame
Before fitting a door frame, you will need to ensure you are fully prepared and organised. You will be handling several different tools and materials, so it’s vital that you have everything you need to complete the task organised and to hand.
Before you begin, you should organise your work space. We advise that your old door frame is fully removed before continuing.
After the frame has been removed, we then recommend you set up your workspace. You will need to clear a large, flat area of space to allow you to assemble your internal door frame.
Open your lining kit, and place all the individual parts down in the area separately. This will also help when it comes to identifying each piece of the frame, and keep you organised.
Door Frame Maintenance
When it comes to maintenance doors and frames in most households can often be neglected. However, you should ensure that they still should be cleaned every once in a while to keep up any maintenance and appearance.

Cleaning your door frame is a simple task, we recommend the following:
- Dust your door frame
Take a soft microfibre cloth and dampen it with warm water. Then wipe down the frame with the cloth to remove any dust.
- Removing marks
To remove marks or smudges you will need to take a spray cleaner, or fill a bucket with warm soapy water and a sponge. Lather the surface of the frame with the sponge and use circular motions to remove any marks. Once the marks have been removed, use a dry soft cloth to dry the surface fully.
- Wooden door frame
If you have a varnished wooden door and frame, you may wish to invest in Oil Soap to clean the frame. To do this, take a cloth or rag and pour a generous amount of oil onto the rag. You can then use the rag to wipe the surface of the frame. When doing this ensure that you wipe in the direction of the wooden grain. Then use a dry cloth to dry the door and remove any excess residue.
- Painted door frame
If your door frame is painted then this can be cleaned using warm water and soap or you could consider using an all-purpose spray cleaner.
How to Remove a Door Frame
Removing a door frame to make way for the new frame is a fairly simple task and you can do this using some common DIY tools.
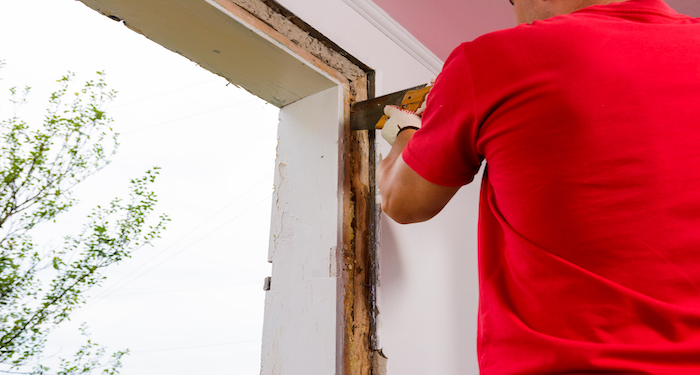
- To remove a door frame, you must firstly remove your door.
- To get to the original door lining you will need to remove the architrave. To do this you will need to use a utility knife. You will need to run the knife to cut into the edge of the architrave on the edge that meets the frame and also the edge that meets the wall.
- Take a hammer and a wood chisel, placing the chisel into the groove you have just marked out and lightly tap this with a hammer until you have created a small gap in the architrave.
- You will need a small offcut of plywood and a utility bar. Carefully pry the architrave from the wall using the utility bar and place the plywood behind the trim to stop any damage to the wall. Work your way up the trim and loosen it in different places until it comes away. You will then need to repeat this process for the rest of the architrave surrounding the door.
- You are now able to access the old door lining. Using a saw cut into the wooden jamb about half way in height. Cut at a slight angle downwards. This is important to help with the next stage of collapsing the current frame.
- Using a utility bar at the intersection you have just created in the jamb, and hammer the bar lightly which will allow the wooden frame to collapse. Use your utility bar to force the frame away from the wall.
- It is at this point you should also remove any old nails from the frame.
- Clean up the area in preparation for your new frame.
FAQs
Q: How wide is a door frame?
A: Generally speaking, the standard width of a door frame is 34 inches. This is for all interior door frames, such as bedroom, bathroom, and hallway doors.
Q: How tall is a door frame?
A: Generally speaking, the standard height of a door frame is 6 feet 8 inches.
Q: What is the difference between a door frame and architrave?
A: The door frame is the structure created from two jambs and a headpiece often contained in a wood lining kit.
Architraves are decorative mouldings and these are not included in a door frame kit. You can buy many different types of architraves, and can often purchase them to match the style of your skirting boards.
Q: What type of wood is used on door frames?
A: The most popular choices for interior door frames are: adler, maple and pine. Pine is the most popular.
Q: How do I measure the size of my door frame?
A: To know what size door frame you will need to replace the current one you will firstly need to remove the architrave around the frame.
Once this has been removed, you will need to take a tape measure and measure the depth of the lining between the two wall faces of the frame.
Then continue to measure the width of the lining at the head, and also the height of the jambs. You will then have the correct measurements you need for your new door frame.
Sources
- https://www.wonkeedonkeexljoinery.co.uk/fitting-a-new-door/how-to-fit-an-internal-door-frame/
- https://www.doorsuperstore.co.uk/blog/how-to-maintain-internal-and-external-doors/
- https://www.vividdoors.co.uk/external-doors/external-door-maintenance-how-to-maintain-your-doors
- https://www.youtube.com/watch?v=yqGoSBWixNU
- https://cleaning.tips.net/T006418_Cleaning_Your_Interior_Doors.html
- https://www.expressdoorsdirect.co.uk/doors/door-frames/top-tips-for-repairing-damaged-door-frames
- https://www.doityourself.com/stry/what-is-the-standard-door-frame-width
- https://www.quora.com/What-is-the-standard-height-for-a-door-frame